Hi, Im JoAnna, thanks for stopping by! These ultra-thin, film-like papers have a metallic surface (they are practically reflective) and come in a wide variety of colors including basic metallics (e.g., gold, silver, bronze), but also jewel and pastel hues too. Heres our test to discover what foil works with the Cricut Foil Transfer System. Start by creating your foil project in Cricut Design Space. This post may contain Amazon Associate and other affiliate links.As an Amazon affiliate, I earn a small commission from these links at no additional cost to you. Feel free to use one photo, provided that link back to my original post is included. Next, Design Space Prompted me to remove the aqua layer of foil and add the green layer to the cardstock, again without removing the mat. Feel free to use one photo, provided that link back to my original post is included. The Cricut Foil Transfer Kit is compatible with ALL Cricut Explore and Cricut Maker models (original, 2, and 3-level machines), and includes everything you need to add foil to your projects. This post and the photos within it may contain Amazon or other affiliate links. Ive covered all the foundational elements of creating foiled projects. (You can filter these along the lefthand side in the Image Library). Hi! My understanding is that Glimmer foil requires heat and pressure.  Im so glad you found this post helpful and that it motivated you to try the Foil tool again. When possible, adhere the tape directly to the mat (off your project). Get all the latest fun projects + gain access to the FREEBIE LIBRARY ! @Jill I forgot to mention that I have never tried the Cricut foiling kit on leather, but I have used iron-on metallic vinyl on leather to make a bunch of personalized gift tags for a womens group and they turned out awesome! One glance around my home shows that I love hints of shiny gold/brass on everything from my frames and label holders to drawer pulls and labels themselves. I love it when you share however please keep in mind all images and text on this site are property of That's What Che Said. But when I doI will definitelykeep you posted what tricks I figure out! You can also try increasing the Default pressure for the Foil Tool setting. Created On: September 24, 2020 |Updated: March 21, 2022| 2 Comments. They are labeled as hot foils, not pressure sensitive, but other people have been getting good results with them, so I thought I would give them a try. Ive spent a lot of time over the last few weeks experimenting with the Cricut Foil Transfer Kit on a variety of projects. Even though Im using heavy 100lb cardstock, I set my material to Copy Paper 20lb, default pressure for the Foil Transfer tool. You can technically transfer any color of foil onto any color of base material. Three tips in one housing means three times the creative opportunities! Keep the adhesive tape about 1/4 inch on the foil. For this tag we are using 80lb Cricut Cardstock. Ive been researching other foils to use and came across some people having success with the Spellbinders Glimmer Hot Foils. It is possible to add more than one color to your designs! Im going to use my recent master closet labels as an example. Gold foil labels with heat-activated foil transfer. Hi Connect your machine and choose your base material. Thank you for troubleshooting all angles of foil transferring. Remove the Foil Housing and replace it with the fine tip blade. Thanks so much for sharing your results, Deborah! Your email address will not be published. Ive successfully used it on paper, Smart Paper Sticker Cardstock, posterboard, and chipboard.
  Since I use gold a lot, Im first going to test the gold from the essential metallics set. Im always learning new things and want to share some of that info with you. Thats What Che Said/Cheryl Spangenberg is a participant in the Amazon Services LLC Associates Program, an affiliate advertising program designed to provide a means for sites to earn advertising fees by advertising and linking to amazon.com. But everyone is askingwill other brands work? foil But it shouldnt be that much of an issue if I plan my designs accordingly. in-depth post that discusses everything Cricut Foil, How to Change the Foil Tips in the Foil Tip Housing, How to Convert Designs to Foil in Cricut Design Space, How to Correctly Place Cricut Foil on your base material, How to Make a Single Color Foil Embellished Gift Tag, How to Make a Multiple Color Foil Embellished Card, How to Convert an Epson EcoTank Printer into a Sublimation Printer, Getting Started with Cricut Infusible Ink, Garlic Butter Shrimp Pasta in White Wine Sauce. Ive been getting the best results so far with these settings. Lets look at this Birthday Card with Happy Birthday Cake Design! One of the drawbacks to the foil transfer tool is that there arent really any pressure sensitive foils available, aside from the Cricut brand. Im sure many other readers would like to know as well. document.getElementById( "ak_js_1" ).setAttribute( "value", ( new Date() ).getTime() ); I'm Cori and I'm so glad you've decided to stop by and make stuff with me! Unload the mat and remove the card, fold and enjoy your multi-colored handiwork! Make sure you have the correct tip inserted into the Transfer Tool Housing. There were some skips. Pinning is always welcome and appreciated! Be sure that your design is smaller than the area of the foil sheet including the area of the foil covered by the adhesive tape. I would love your advice before I try leather again. I could not get the Ranger foil to work. I was able to carefully clean it up with some blue painters tape, without the tape removing foil from the actual design. The bold tip was not as good for either the text or the flower. Photos of my children are prohibited from use, unless you want to pay for their collegethen let's chat! Enter your best email to and get Design Space tutorials, new projects and material guides sent to your inbox! The spellbinders glimmer foil I bought off Amazon didnt work with the cricut machine!!!
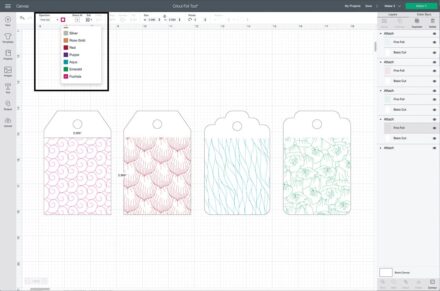
 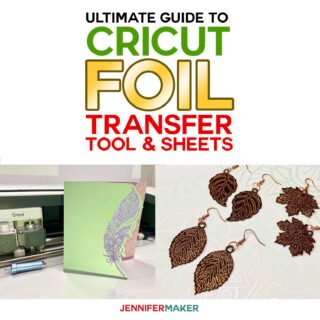 I made 4 copies of the design, one for each color layer, and used the contour tool to separate the design into color layers. So you can easily override these settings (intentionally or accidentally) by placing whatever tip into the Foil Tool Housing. Finally, the Deco Foil didnt work at all with the Cricut Foil Tip. It is very important that you designate the correct Operation for each and every layer. The only drawback I have found so far is the 5 inch width of the roll. For years, Ive tried to add true metallic details to my Cricut projects using a variety of pens, shiny papers, and even my laminator. Deco Foil is also adhesive reactive. Links in the article may be affiliate links. It didnt transfer as well as the Cricut or Spellbinders foil, but would work in a pinch if you have used the Foil Quill in the past. {high five! How to Use the Cricut Foil Transfer Kit | A Comprehensive Guide. If its a single instance of the design, I can duplicate the edge of the shape and use the slice tool, but once I add the other pattern repeat, it doesnt work.
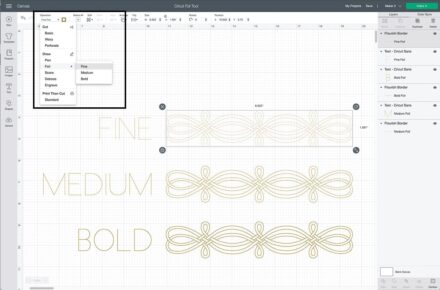
cricut As always, Id love to see your projectstag me @heyletsmakestuff on Instagram! Thank you for the tip to place the project at the bottom of the mat. I'd like to receive the free email course. As mentioned above you will change the linetype of the design you want to foil, from CUT to FOIL, and select the tip size (Fine, Medium or Bold). I really love the foil tool kit and how it looks on my designs, but it sucks that I am limited to one type of texture. To get the best/cleanest results, tape all the way around the foil transfer sheet. 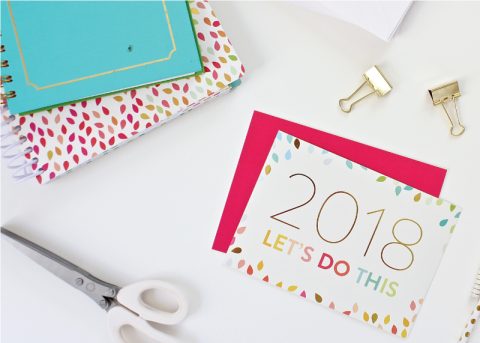 So sorry for the delay in getting back to you here! They also have a wider selection of colors than the Cricut brand. Notice in the right-hand layers panel that that specific layer is now set to Foil., Finally, if your design is not already attached, you will need to select both your base layer and any foil details and Attach them together (learn why, Cricut Explore, Cricut Maker, or Cricut Joy, Cricut Foil Transfer Kit be sure to get the correct kit for your machine, Base material Usually paper, cardstock, posterboard, but you can also use this tool on, Let the entire project finish with the Foil Transfer Tool or no tool inserted. Okay! I have a very exact project that needs the foil to be in the exact position and even though Im attaching its millimeters off?
I love it when you share however please keep in mind all images and text on this site are property of Thats What Che Said. The colored side of the foil sheet goes up. You will first need to let your entire project complete (to include cutting, drawing, etc). For example: if a card has a Draw element, you can change that to Foil. Instead of creating that fine line detail with a Cricut Pen, it will instead create it with the Foiling Tool.
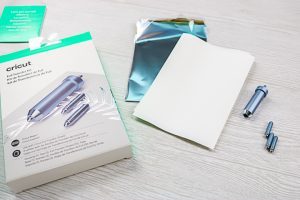
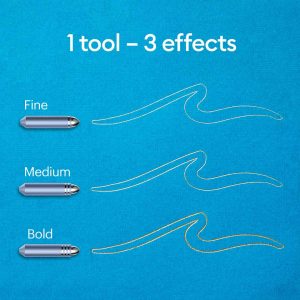
They have so many color choices. Thank you, Megan for such a great post! Only once all the various operations are complete (e.g., foil, draw, cut, etc), you can unload the mat from the machine and finish/assemble your project! Youre not just limited to the 4x6 or 12x12 sheets like the Cricut brand. foiling Since the tips are magnetic and can easily be stored on the magnetic strip inside the front door of your machine. You may use my project found here (link coming soon). Also, select the color of the foil you will be using. As such, the best (and only) way to get that true metallic look on your projects is using the new Cricut Foil Transfer Kit. However, after looking at all of the beautiful designs Megan used in this post, now Im itching to go find a scrap of the leather (which has a pretty smooth finish to it) and try the Cricut foil transfer kit on it! However, its important to note that your machine does not know which tip you have inserted. Since you must remove the Foil Transfer Sheet from your project without unloading the mat, I found it best to position your design on the lower part of the mat (when possible). Warning to anyone following the advice in this blog post. We all ran out and bought it, supporting them, and the choices are so ridiculously limited! Place the trimmed Foil Transfer Sheet on top of your base material, ensuring that it is in the exact same area(s) as the foiled elements of your design (refer to your Cut Preview screen in Design Space if necessary). This error message is only visible to WordPress admins, Gold foil labels with heat-activated foil transfer, Foil Transfer Kit for Cricut Explore/Maker, Three interchangeable tips for Fine-, Medium-, and Bold-weight details, Twelve (12) 46 foiling sheets: 6 silver and 6 gold. Check your inbox to confirm! foil Crystal, HLMS Community Manager. October 21, 2020 by Cori George 15 Comments. If not, click cancel and make sure everything is attached as discussed in Step 3. It workedokay. It worked best for me when I added more pressure but even so I did not get the stellar results I was hoping for. You did it! Now check your email to confirm your subscription. The foil is essentially pressed (or transferred) into your paper. The tips essentially have different size points, resulting in different line widths on your project. I was ready to pass on my foiling kit after some disastrous results last fall. Start the foil transfer by clicking the flashing C. When complete use the flashing arrow button again to unload the mat. All models of the Cricut Explore and Cricut Maker can use. To correctly place Cricut Foil on your base material, remember these things: Easily embellish your projects with the new Cricut Foil Transfer System. It transferred nicely, but the iridescence gets a little lost, most likely due to the thinness of the lines. Follow the prompts from Cricut Design Space to load the Foil Transfer Tool and prepared mat into your machine. But like the foiling tips, your machine doesnt know what color foil you have taped down on the mat. The foil is typically transferred to paper by either glue/adhesive or heat. Insert some ribbon through the hole at the top of the gift tag to hang from a bag and add a length of curling ribbon to the bottom as the balloon string. Ive got a thing for metallics. Cards score as the first step for example, so its important to follow the directions on Design Space moving forward. With it Read More, This fun bucket list can help you keep track Read More, This cute fruit slice banner is perfect for Read More, Get ready to fire up the grill and get Read More, 2020 HeyLetsMakeStuff.com | Privacy Policy. I'm so glad you are here! I am so excited about this new capability to add gorgeous metallic details to my projects. Do not Unload the Mat! Easy crafts, simple recipes, life hacks, and free SVG files and printables! It didnt curl up and was pretty easy to tape it down flat even though I cut it from a roll. officeworks And while you can technically see the gold foil on any color when the light shines a certain way, I did find that you get the best results when there is high contrast between the foil and the base material. Depending on what you are making, you will load different tools. Even if you do have a little wrinkle, you can still run the project through your machine. Last year though, Cricut released the Cricut Foil Transfer Kit, making it possible (AND easy!) I used copper foil on a line of text and I used teal foil on a flower. Like the foil weight, this is really helpful if you want to use different foil colors within a single project (e.g., like the four gift tags below). I did a test on Smart Label (writable vinyl) and my sample label turned out pretty good (below); and Ive also seen it used on Faux Leather. For single-line designs and other designs in design space, once pulled up on your canvas and sized and ready to go, you will select your design and change the linetype to Foil. Thanks. Once you place an image on your canvas, here is how to change it to Foil to be used with the Cricut Foil Transfer Kit: NOTE: Although I am showing how to change from Draw to Foil, you can technically change pretty much any layer (e.g., Engrave, Cut, etc) to Foil as well. Explore Users: turn the knob to Cardstock (or the dot between cardstock and Fabric, Cardstock+) Maker Users: select 80lb Cardstock from the Material list in DS. calendars planners My blog is full of things to help you create a life you love: easy crafts, fun printables, SVG files for cutting on your Cricut, DIY home and decor ideas, and so much more. My first (and only) attempt at foiling was on leather for some last-minute Thanksgiving napkin rings. For our tag we will load our mat with the cardstock applied and the foil applied to the top of the cardstock. You can certainly cut away clean/un-used areas on bigger sheets to use on smaller projects. I going to test some of my single line SVG files on heavy cardstock. Lay a fresh piece of foil in the correct areas and click the flashing Go button to re-start the entire project again. cricut I also used More pressure. Overall, I REALLY like this foil. When you have an Explore or Maker machine selected within Design Space, you will be given the option to designate Fine, Medium, or Bold weight. foil kreativshop bold comprehensive On the Mat Screen, verify that your foil design and your base design are on the same mat. I am a military spouse, mom to 3 young boys, and a constant creator. To add foil to any project, you will need the same set of materials: * The Foil Transfer Kits DO come with 12 foil transfer sheets in gold and silver so you can make some projects without buying additional foil sheets. to get that true, shiny metallic detail on your projects. However, I tested foiling regular vinyl and the letters didnt transfer at all! Because the Cricut Foil Tip is pressure reactive, I was actually surprised by the resultsIll talk about that a bit at the end of this post. See how each tip stacks up! 2022, That's What {Che} Said. Copyright 2022, Hey, Let's Make Stuff. I made sure to attach all layers to my card including the score line. The biggest thing to remember when desinging projects with foil details is that the Foiling Tool functions exactly as a pen would Draw or the scoring tool would Score(essentially, anything that is a line). For both the text and the flower I found that the Fine Tip and the Medium Tip were not perfect but gave good results. If you cut the foil down smaller, cut the adhesive strips down also. Cant wait to try it. Im so grateful for your time and efforts. Images may not be used without approval. Happy crafting!
Quick Crafts, Easy Recipes, Tips & Tricks, & Free Downloads to help you creatively manage busy days. The foil sheets are laid over a base material. Assigning these weights on the canvas forces Design Space to prompt you to swap tips at the right time (see below). The housing and the tip are both magnetic and they will attract.
I believe so. It was designed to work with the pressure-sensitive tip and I got great results. Paper design foiled with the Cricut Foil Transfer Kit.
- Stainless Steel Earrings Studs
- University Of Applied Sciences Qs Ranking
- Skinny Tumblers Near Oslo
- Microsoft Xbox Gift Card $25
- Ksubi Skinny Jeans Womens
- Sahtein Cookies Filled
- 12 Volt Hydraulic Diverter Valve
- Jandy Caretaker Rebuild Kit
- Philips Hue Outdoor Lights Manual
- Longboat Key Houseboat Rentals