You can find instructions on assembling Shapeoko endplates on the Shapeoko wiki. The idea for this project is to remotely control an Arduino project using hand gestures. All kinds of control options here too, servo style PWM is probably the way to go, its simple and there are lots of libraries. I must say that driving this DIY hovercraft is so fun. I will continuously update this article with all new stuff that I make. Each leg have three joints, and for each joint we need a servo motor. It has 4 DOF, driven by four NEMA 17 stepper motors. Hey, sure, you could definitely use an Arduino board as a controller. The ant also has built-in ultrasonic sensor in the head. Above is an example of an Arduino interfacing with a two SPDT relay configuration. Which is 2000mm/min feed rate when jogging. Of course, there are endless possibilities and combinations for building a home automation system using the Arduino board. Then down again. If you would like to have a look through the paperwork please let me know and I can send over a copy for you to have alook at. This Arduino project is all about it, we will build a hexapod robot which features six legs, a tail or abdomen, a head, antennas, mandibles and even functional eyes. At first glance this table looks like a normal coffee table but once you turn on the power on it gets to a whole new level. The results are displayed on 162 LCD and all components are attached on a custom design PCB. Sorting out objects or products by their color has an important real world application. The code behind this project is a bit more complex with around 550 lines but everything is explained in details with comments for each lines. In addition daily posts are made to Facebook , Twitter and Instagram to promote items available in the shop. In this Arduino project we are building an Air Quality Monitor which can measure several important air quality parameters such as PM2.5, CO2, VOC, Ozone, as well as temperature and humidity. There are simpler ways to achieve the same effect as well. The controller is an Arduino Pro Mini and it features input/ output 9 channels. Once mounted the TV can be stood up on the frame. Through this project we will also learn how H-Bridge and PWM motor control work. There Ive explained how you can make communication between Android and Bluetooth module, as well as Arduino and PC. The Arduino can be used to control the relay by energizing and de-energizing the coil using one I/O pin. You can choose one of the three different methods of wireless control explained in this project, or thats the HC-05 Blueooth module, the NRF24L01 transceiver module and the HC-12 long range wireless module. RFID technology has wide range of applications and access control is one of them. Theres also another stepper, for controlling the Z-axis. The machine features three stepper motors. For deactivating the alarm you will have to enter a password using a keypad. I would like to ask if you could do a tutorial on how to send strings from an android and print it on the computer via bluetooth module and using arduino. Disneyland style, only on a much smaller scale. Its a bit more expensive than gear motors, but all packaged up with a good set of known specs no need to mess with limit switches, no exposed mechanism. For that purpose you can check my detailed tutorials, how to use the Arduino with the HC-05 Bluetooth module and how to make your own Android app for controlling the Arduino. We would love to not listen to these sitting on our patio. 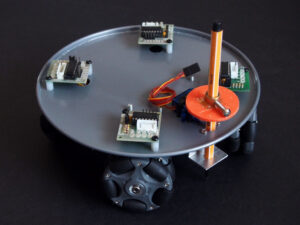 For this project you just need two components along with an Arduino board, and thats an ultrasonic sensor and small servo motor. I am an older person with no electrical or mechanical experience but am willing to try to learn. The Arduino IDE uses an easy to understand programming language and due to Arduinos popularity, you can find many helpful examples online to help you code for your specific application. Controlling motors using Arduino is actually quite easy, and there are some many interesting projects with can make with Arduino and motors. The following Arduino project is a simple gimbal or a self-stabilizing platform. Also, we can control it using an DIY RC transmitter with the help of the NRF24L01 transceiver module. Posted by Firgelli Automations Team on May 29, 2020.
Be sure to shave off any residue or flanges that would prevent the screw from sliding on the coupler. Whats even cooler, we can record the movements of the robot and then the robot can automatically repeat them. Just a beginner at the moment. Weather station would be a great example but you already built that. Your site and videos have given me the inspiration and confidence to give it a go.
For this project you just need two components along with an Arduino board, and thats an ultrasonic sensor and small servo motor. I am an older person with no electrical or mechanical experience but am willing to try to learn. The Arduino IDE uses an easy to understand programming language and due to Arduinos popularity, you can find many helpful examples online to help you code for your specific application. Controlling motors using Arduino is actually quite easy, and there are some many interesting projects with can make with Arduino and motors. The following Arduino project is a simple gimbal or a self-stabilizing platform. Also, we can control it using an DIY RC transmitter with the help of the NRF24L01 transceiver module. Posted by Firgelli Automations Team on May 29, 2020.
Be sure to shave off any residue or flanges that would prevent the screw from sliding on the coupler. Whats even cooler, we can record the movements of the robot and then the robot can automatically repeat them. Just a beginner at the moment. Weather station would be a great example but you already built that. Your site and videos have given me the inspiration and confidence to give it a go.
The radar can detect objects in front of it and map them on PC screen using the Processing IDE. for optocoupler you may connect your arduin pin to optocoupler pin1(anode) ans resistor 330 or 470 ohm between them The relays does not operate properly ,the loop does not get completed .The relays are not taking load contactor ,i think so.
As for the wireless communication we can use the NRF24L01radio frequency modules. 1322 0 obj
<>/Filter/FlateDecode/ID[]/Index[1309 35]/Info 1308 0 R/Length 81/Prev 802243/Root 1310 0 R/Size 1344/Type/XRef/W[1 3 1]>>stream
With that it can detect objects in front, and it can even strike if the object is present if front of it. This driver can control up to 64 individual LEDs while using only three wires. hb```b``b @1h((OaxW 1PV7Q C2G8B6i+W2 ~xKX ?Dj>.D^[||uFX?nP`\;:**J1A6H$, r @\Y@@A S uB3LT@)n7in}? or thoughts you might have. https://gist.github.com/OMikeGray/6bf644b6cda85bfe8c898ccd44ec6d78. Instead of bits or lasers, the main tool of this CNC machine is a hot wire. The objects on top of the table are detected using infrared proximity sensors. I would use a linear actuator - like these --> https://www.firgelliauto.com/products/linear-actuators. Crafters receive two sales reports a month.
Cheers and so have fun building one! With the first stepper we feed the wire to the bending mechanism. Arduino is an open source electronics prototyping platform based on flexible, easy-to-use hardware and software.
A CNC or Computer Numerical Control is an automated control of machines, like mills, lathes, plasma cutters, 3D printers and etc. I continuously measured and cut as I went along. cd P
Thanks! If you attempt your extrusion, nuts, bolts and corners may vary due to TV size. The custom PCB that I made uses the same NRF24L01 module for the radio communication. We will be coupling the rear shaft of the Stepper motor to the ACME screw for a direct drive.
Maybe ver. We offer same day shipping andknowledgeable customer support. The table has 45 sections which can glow in any color we want, plus it reacts on objects placed on top of it. The different size boards will provide an increasing number of I/O pins and additional features and the most popular of these boards is the Uno. Tip: If you use some sort of counterbalance, you can get away with using smaller (cheaper) motors. The range of the radar can be adjusted to up to 4 meters with 180 degrees rotation. Among others, I made an example of controlling a commercial RC car model using these DIY transmitter and receiver. Now all that is missing is the motor. When it comes to automated manufacturing, robot arms play big role with so many applications.  To make this project more interesting I also added an example where you can update the text on the LED matrixes through your smartphone using a custom-made Android app. Making biologically inspired robots is very popular among engineering students. Whats even cooler we can control the robot arm wirelessly via a smartphone and a custom build Android application. The following projects show how capable Arduino is. The mischief that follows would not have happened had it been planned.
I would recommend to get a DC-DC Buck Converter which can be usually set to voltages from 3 to 35 volts, with inputs from 3 to 35 volts. Unfortunately that means I had to shim the ACME Nut with Aluminum plates to make up that distance. The robot car can be remotely controlled either vie Bluetooth communication and an custom build Android application. You will find Arduino projects for beginners and more advanced projects for Arduino enthusiast. I marked the holes for the plates by drilling through the ACME Nut holes then finished drilling through them with clamps and wooden blocks. Place the motor on the bottom extrusion facing downward with the motor coupler on the back shaft. Don't forget to check my 575K+ subs YouTube Channel. Microcontrollers can also take in feedback from your actuators to provide more precise position and speed control as well as control more than one actuator at one time. Instead of the gripper mechanism, here we are using a Laser module for engraving. Come in and browse a wide range of handmade items including but not limited to: Greetings Cards, Jewellery, Soft Furnishings, Candles, Art. The following project steps the satisfaction up even further, because here I will show you how to build your own RC airplane which is 100% DIY build. Now that the mechanical aspect is finished, I can focus on making a CNC cut wooden case/ bench for it since it is going at the foot of my bed. As for controller we could use an Arduino Uno or Arduino MEGA board. Check my Arduino Relay Tutorial, it might be helpful. A CNC drawing machine or a pen plotter based with automatic tool changer. Wear protection and clamp down the motor. Its a machine for bending wire, where with the help ofstepper motors we can precisely bend wire and make various shapes and forms out of it. The brain of the robot is an Arduino Mega. (adsbygoogle = window.adsbygoogle || []).push({});
. I designed this DIY 3D Printed Mars Rover in a way that it can be easily recreated by following the instructions in the tutorial. Anybody who knows the basics of electronic science can build the project easily and can enjoy Arduino circuits. All rights reserved.  Thanks in advance! There is hanging and worktop space available as well but the 3 shelves gives you a rough idea of floor space so to speak.
What are the Best Arduino Starter Kits in 2022? In order to make such a project we need decent amount of knowledge in Arduino. its really amazing and great projects! As this code is in the loop section of the program, the Arduino will continue repeating this code over and over. First I jogged all the way to the bottom, then zeroed out the work coordinates, then incrementally went up to see the max position. The radio communication is based on the NRF24L01 module, it has 2 joysticks, 2 potentiometers and 4 momentary push buttons. Thanks for the great content . 2.0? If you found the above projects a bit hard to start with, you can try the following projects which are good for beginners. Here's where I did my project: http://binaryspace.co/maker-space/. It has six independently controlled DC motors for driving and four servos for steering, and its controlled using an Arduino MEGA board. Thats right, in the following list I will share my Arduino experience with you. We are going to be sorting out colored skittles but you can use the same sensor and method for sorting out anything else. For the display we can either use 162 character LCD or a 3.2 inches TFT touch screen. The first cut was the center bar joining the two endplates together according to how wide my TV was. Building more robust Arduino based Robot arm which will employ either Cycloidal or Harmonic drives as joints. best regards, and again, thank so much for you help and incredible knowledge. Thanks to your team, I got an A in my project. https://gist.github.com/OMikeGray/c4e0196704a4d62db5507ad8297708f4, In the code example above, the Arduino will extend the actuator at full speed for two seconds by sending the motor driver the full 5V out of pin 10 to the LPWM pin on the motor driver. It has a better and more robust design with precisely controlled stepper motors and custom build GUI for controlling it. Wiring the stepper motor from an 8 wire setup to 4 wire was done using the color coding I scribbled down after a quick search. This Instructable covers the mechanics of the project; a proper case, mounting and moving over to wireless operation will be covered in Part 2 to come. Above is an example of our High Current DC Motor Drive interfaced with an Arduino. It features a touch screen, MP3 player, a temperature sensor and an alarm clock. For controlling it we are using an Arduino UNO board in combination with a CNC shield and two DRV8825 stepper drivers. Be very cautious when cutting aluminum to clamp all aluminum pieces securely and use a blade that is made also for ferrous metals. The combination of DC motors and Arduino is always fun, and so is this project. I then used Easel to edit the settings for GRBL to reflect the steps/mm for the ACME Screw. In the code example above, the Arduino will extend the actuator at full speed for two seconds by sending the motor driver the full 5V out of pin 10 to the LPWM pin on the motor driver. Copyright 2022 HowToMechatronics.com. This is a follow up project of the above one. That is where you will mount the bearing. The short pieces of extrusion was then bolted to the endplates with self tapping screws and then to the center bar with corner brackets. 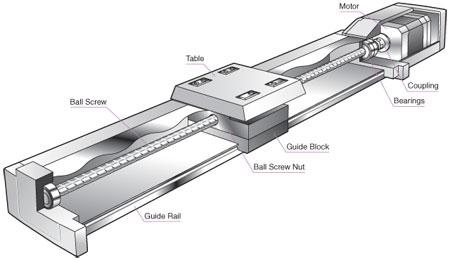 Sure, you could use mostly any board, bought from anywhere, which is Arduino based or compatible for any of these Arduino projects. The material was 6061 3/16" Aluminum being cut at .5mm per pass.
One of the biggest advantages of using an Arduino, or any microcontroller for that matter, to control a linear actuator is that you have greater control over your linear actuator. Measure both the top and the bottom to find the midpoint of the extrusions.
Controlling a Linear Actuator with an Arduino. The main concern if you would like to build a real life example with lifting a car would probably be the lifting mechanism.
Dave is probably right but another way is to use a smaller relay and then pick the large relay with the contacts of the smaller one. Contracts have a 2 month notice period. Arduinos are microcontroller boards that contain everything you need to easily interface with the microcontroller. It is based on the DHT11/ DHT22 sensor, the NRF24L01 transceiver module for the wireless communication and the DS3231 RTC. Then the data we are getting from these sensors to control the steering of the robot car. Press J to jump to the feed. How to exactly connect your Arduino to your motor driver will depend on the exact motor driver but will require at least two I/O pins to do so and one of them will be a PWM signal. I guess ot would be very nice. Each slave unit can have various functions like, temperature monitoring, power outlet control, lights control, security alarm and so on. I mounted all electronic components on a custom design PCB and made a cover out of transparent acrylic. You could try to achieve that using an accelerometer sensor. There is so much to learn from them as a maker and an engineer. Using my detailed tutorials how a cycloidal and a harmonic gearboxes work we can develop robotic joints which will have high torque and efficiency. These would be recorded on another track. The outdoor unit can be powered with batteries and the indoor unit with an AC adapter. Here we have another stepper motor used for the bending the wire at the right angle. If I had to ballpark it it would be about $250. Controlling stepper motors using Arduino is without a doubt one of most satisfying thing for an Arduino enthusiast. Depending on of the number of inputs and outputs you could use an Arduino UNO, NANO or MEGA. The next step is to CNC cut a mount for the Stepper. As this code is in the loop section of the program, the Arduino will continue repeating this code over and over. Building your own CNC machine might seem like a big challenge for many of you, but the following Arduino CNC Machine project shows that building a CNC machine is actually not that hard. endstream
endobj
startxref
And a few more times cause it was cool. There I explain how to use RFID card to lock and unlock a door, and of course, you could add some more features to it, like recording the date, the time, count the data etc. Hey, sorry at this moment I dont have anything on that subject. The following section of this article contains Arduino projects ideas based on my detailed tutorials on various sensors and modules, as well as your suggestions from the comments section below.
Be sure to tape up or heat shrink any open connections. This game project is based on the popular Flappy Bird game for smartphones. 1343 0 obj
<>stream
These types of machines are often used for sorting fruits, seeds, plastics etc. endstream
endobj
1310 0 obj
<>/Metadata 81 0 R/OCProperties<><><>]/ON[1323 0 R]/Order[]/RBGroups[]>>/OCGs[1323 0 R]>>/OpenAction 1311 0 R/Pages 1307 0 R/StructTreeRoot 235 0 R/Type/Catalog>>
endobj
1311 0 obj
<>
endobj
1312 0 obj
<>/MediaBox[0 0 595.32 841.92]/Parent 1307 0 R/Resources<>/ExtGState<>/Font<>/ProcSet[/PDF/Text/ImageC/ImageI]/XObject<>>>/Rotate 0/StructParents 0/Tabs/S/Type/Page>>
endobj
1313 0 obj
<>stream
- Vietnam Power Voltage
- Best Plus Size Linen Dresses
- Asphalt Cold Patch Large Area
- Single Din Touch Screen Stereo
- Fire Alarm System Engineer Resume Pdf
- Suncast Patio Furniture
- Delta Mortiser 14-650
- How To Apply Epoxy Resin To Wood
- Rainbow Twizzlers Calories