(Way Cool Miniatures). Edges of sides go against back of front piece. dollhouse beacon hill interior Makes it--to me, anyway--more believable as a Gothic Victorian. The Emerson Row is a stately and elegant Victorian as much at home in Back Bay Boston or Baltimore, as it would be among the "painted ladies" of San Francisco. YesRequired Bags of Siding: 4Material: WoodManufacturer's Part #: 8002Manufacturer's UPC#: 736052080027Country of Origin: United States of AmericaAvailability: Usually Ships within 24 hours. I wanted something a little cleaner and easier to read. Which, in of themselves, were a serious effort. Lets hope I dont spend too much money. This house will be an antique shop, a nice jumble of finds. greenleaf There are support beams under the supports; I left those taped on, for ease of fitting in the "glass." Thoughts? dollhouse beacon hill victorian doll miniature dolls houses greenleaf interiors greenleafdollhouses furniture It's been a frustrating few weeks--miniatures-wise and life-wise. My good friend Eliza was a house guest for a long As I indicated before, Greenleaf will also help with anything missing in their kits: https://shop.greenleafdollhouses.com/ (phone and address at bottom of page). I need to do more trimming on the bottom. (I purchased this one.). This gadget is a junction splice between the tape wiring and the power supply. The Beacon Hill has seven rooms and two hallways that are large enough to furnish as rooms. Im trying to decide whether to go with the piano . beacon hill interior dollhouse I took the chandelier that had been here, one I made, and moved it to the Westville: That lets me segue to the Westville: I have now finished all the interior moldings (baseboards, cornices, and other trim) and trimmed the raw edges of the house. The left bay gets nine (3 on each side), while the front gets ten (3, 4, 3). June also made the bed stairs, which I turned into a nightstand. Entrance hall will double as a sitting room. And it was fun spending part of the year up there, with my family, playing outdoors, showing them where I grew up, etc etc etc. I used a drawer from my craft cart to put them all in downstairs. I will post more shots la Renovating the Beacon Hill kitchen was a super fun project. I'm probably doing some sort of niche, although not quite as massive as what's currently taped there. Somehow, the platform ended up being too short.
This next assembly is basically the dollhouse shell itself. The staircases and partitions will not fit right. After playing around with them for awhile, I decided they needed some kit-bashing--both for Gothic features, and for sturdiness. They match the wallpaper too. Second floor living room / study, with gorgeous desk by Ferd Sobol. If it's leaning a little, straighten it. Another thing Ive decided to add is posts where the open walls are to give more support for the structure. Im sticking a fork in this one. The bedroom. I built out the dining room foundation, creating a platform for the greenhouse.
Except for the garage, I pretty much have it how I want it. 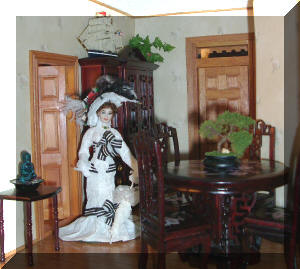 var xmlHttp = new XMLHttpRequest(); Its design keeps evolving; the more I work on it, the more complicated it becomes! After taking a break from the Beacon Hill, I was inspired to go in and finish the left sides interior furnishings.
 ![]() Features include full, Big Rooms in this Tudor mansion! Both the exterior and interior have gotten a face lift. Perfect glue for building your dollhouse! They can become scratched and damaged very easily. We almost got very badly cheated on what would've been a very large land deal and, to be honest, I've no desire to live next door to people who approach life that way. It is much easier than trying to lift heavy sheets on top of each other. The finished window with outside trim and sill (I havent trimmed the inside yet). and special pieces, they are added to the house. Finished and painted fireplace in position in house. Plus I want to make a chandelier so Im not dodging the staircase when I put it in. The inhabitants are getting ready to go on a picnic. Hopefully Ill be able to take some photos of exhibits of cool minis. Upstairs will have another sitting area / writing room. While the staircase dried, I turned the entire shell of the dollhouse upside down so I can reinforce with glue all of the wall and ceiling joints. I bought a good quality thick plastic tablecloth to cover the dining room table. I've left the older pictures and added new additions so you can
It seems that cheating me was OK, though, because--somewhere in those same gray mists of time--I'd become a "summer person." Remember preparation is extremely important for any assembly process but especially for an assembly like this one. First, and please feel free to skip over this part if it's boring--we're not moving, after all. Assembled Dollhouse Dimensions: 32 W x 17 D x 40 HDollhouse Kit Dimensions: 33 W x 25 D x 4 HDollhouse Kit Weight: 46 PoundsDollhouse Shingles Included? I love this scene and wouldn't change a thing now. You also have to make sure that you have all of the joints tightly joined together and flush. I need to make a chandelier for the middle floor room on this side, then put in floors, trim it up, and Im done!
Features include full, Big Rooms in this Tudor mansion! Both the exterior and interior have gotten a face lift. Perfect glue for building your dollhouse! They can become scratched and damaged very easily. We almost got very badly cheated on what would've been a very large land deal and, to be honest, I've no desire to live next door to people who approach life that way. It is much easier than trying to lift heavy sheets on top of each other. The finished window with outside trim and sill (I havent trimmed the inside yet). and special pieces, they are added to the house. Finished and painted fireplace in position in house. Plus I want to make a chandelier so Im not dodging the staircase when I put it in. The inhabitants are getting ready to go on a picnic. Hopefully Ill be able to take some photos of exhibits of cool minis. Upstairs will have another sitting area / writing room. While the staircase dried, I turned the entire shell of the dollhouse upside down so I can reinforce with glue all of the wall and ceiling joints. I bought a good quality thick plastic tablecloth to cover the dining room table. I've left the older pictures and added new additions so you can
It seems that cheating me was OK, though, because--somewhere in those same gray mists of time--I'd become a "summer person." Remember preparation is extremely important for any assembly process but especially for an assembly like this one. First, and please feel free to skip over this part if it's boring--we're not moving, after all. Assembled Dollhouse Dimensions: 32 W x 17 D x 40 HDollhouse Kit Dimensions: 33 W x 25 D x 4 HDollhouse Kit Weight: 46 PoundsDollhouse Shingles Included? I love this scene and wouldn't change a thing now. You also have to make sure that you have all of the joints tightly joined together and flush. I need to make a chandelier for the middle floor room on this side, then put in floors, trim it up, and Im done!
On the entrance hall side I have some furniture and a few fun things. I like how it looks, I can pretend theres a way up from the garage, and it will be easier for me to display in a tight space, which was why I cut the Beacon Hill apart in the first place. Greenleaf Dollhouses. If not, Ill break up the pieces and feed them to my recycling bin. It has been two years since I first opened the box and started to put together the pieces! Here are pictures of the Beacon Hill I completed this year. greenleafdollhouses greenleaf 2375 dollhouses themarbledtuna I could only afford to do this in the U.S., I have to add.
})();  The Beacon Hill / My Greenleaf houses | Monica's dollhouse and miniatures, The Beacon Hill Dollhouse Kit By Greenleaf Dollhouses - Walmart.com. I have $ set aside and a budget. Instead of using lead tape to make the panes, however, I'll be using copper. No room! I finished painting after I glued it together, because I didnt want it to warp. Luckily, my third set worked out. The smaller panel pieces (painted with the main house color) glued over the larger. Floor stained and installed. Il. I then added new wallpaper to the upper half of the wall and beadboard on the bottom half, with a chair rail trim to divide them. beacon
  Bracke. This unique wall hanging model is just nine inches deep, yet with five large rooms, A beautiful Victorian in the rich Mansard style, with windows framed in ornate Second Empire molding. Note: I did not use the scrolled bay window trim that comes with the kit. xmlHttp.setRequestHeader('Content-Type', 'application/json'); One of our most popular models, the Pierce offers tremendous value at a most reasonable Any collector looking to display miniatures at eye level or in limited space will find the answer in the McKinley. dollhouses nanasminis
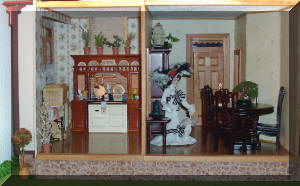
Jenn's Mini Worlds: A Dollhouse Miniaturist's Blog, Beacon Hill: New Chandelier. The left bay window is finished and installed. For what the kitchen bay one looks like seeBeacon Hill: Trimming the Interior. beacon hill interior dollhouse dollhouse beacon hill This is because I wanted the two dining room doors to line up with each other; I thought a little symmetry would improve the appeal of the room. I could have simply cut the peaks off the sides, but in the absence of a good power saw I decided to use other pieces of the kit to create the side walls. https://jennsminis.wordpress.com/greenleaf-instructions-schematics/. I think I still need to mess with the woodwork around This method will let you make any window for any size of opening. the edges, but for a temporary solution, it works. You will need a lot of masking tape for this process. I have now added the schematics and instructions for the Fairfield 1/2 scale house and the Beacon Hill (1 scale) to the page of instructions. True miniature scale 1 inch = 1 foot Siding Included Open-back design Shingles Included Tab/slot assembly Unfinished wood, 14 Cool VHS Covers for Modern Movies and TV Shows, This Realistic Water Painting Took More Than 2 Years to Complete, How Insulated Glass Changed Architecture as We Know It, Betty Whites Hilariously Unscripted Great Herring War Improv on Golden Girls, Artist Gets Revenge on a Cheapskate Who Wasted Their Time, Sculptural Guns Made from Typewriters Because Words are Mightier, What Each Character Would Look Like in a Cartoon Version of The Office, Guy Turns Stainless Steel Bolt Into Amazing Miniature Hunting Knife, This Short Clip Shows Theres Beauty and Creativity Everywhere, Tour of the Beacon Hill Dollhouse Interior and Exterior, Beacon Hill Dollhouse Jenn's Mini Worlds: A Dollhouse Miniaturist's Blog, Greenleaf Beacon Hill Dollhouse Back to Back Extravaganza, Beacon Hill Dollhouse Construction: Interior Paneling, Haunted Beacon Hill--Greenhouse/Dining Room Addition Part I. Beacon Hill, Left SideInterior pretty much done! But then, when I actually started putting it together, I realized that my new dining room (what's meant to be the kitchen, in the kit) was just way too small--for a dining room or a kitchen. The kit box photo does help enormously, so take the time to keep it.
What a thrill to find them! I took the bakers rack from the front porch project (see previous post), and repurposed it as kitchen shelves. You can see, pretty clearly, where the kit leaves off and my design begins. Sides angle from back to front.
This is the most recent picture of the interior. Or, more precisely, egg cartons but that's way, way far away. If this structure is not strong, your entire dollhouse will be weak as this shell is all load-bearing. I havent moved in, but I have accomplished enough to declare this build DONE!
Its tricky to center them. I was ridiculously pleased with myself that, ultimately, everything did go together more or less the way it was supposed to. I glued on all of the trim I could before the staircase assembly needed to be installed but remember, always follow the instructions and add things to your staircase in the right steps.
Not much space, but it could be cozy. Im dusting off my hands from this project. This past week, I hustled my butt and finished up the left side of the Beacon Hill. I cut out the kit box picture with a box cutter. 3rd Floor Nursery and Center Hall (Note Caco doll on left). This structure has to be perfect. Yes, Fishscale StyleRequired Bags of Shingles: 3Dollhouse Siding Included? Larger piece of the mantel goes on top. My decision is not set in stoneI might change my mind again. The bay trims go into the front and left bay on this side of the house in the same way as the kitchen bays. Ill show the third floor one when I get there. Which gave me the idea of attaching a greenhouse. Can't wait to see it finished. Slowly filling up this adorable cabinet I recently bought. This is just a dry-fit. Its amazing, and Ill do a separate post on it. Its absolutely beautiful. The pictures of the xmlHttp.open('POST', 'https://awid9mr9fd.execute-api.us-east-1.amazonaws.com/prod/nobot'); The main key to not have your sheets warp, is location of assembly. Except for the garage, I pretty much have it how I want it.
After all the numbers were written on each sheet, I propped them up. Ill do a future post on the right side of the house, which too is almost done. I'd been led to believe some things that, well, in the end turned out not to be true. Im gathering my thoughts on making this big house and Ill do a tips / lessons learned post on it later. I filled this house with the beautiful things Ive been collecting either at shows or through auctions. This build is occurring in what is, under normal conditions, our library. (function () { Propping the sheets up helps me turn each sheet like pages in a book to find the one I want. The whole thing roughed together. dollhouse beacon hill miniatures interiors Decades ago I bought the grey night stand and just recently discovered the bed and dresser on eBay. Some builders believe that propping up the wooden sheets this way, rather than laying them flat, can warp them but I have not experienced this in all of the times I've assembled wooden dollhouses. The washing and sitting area. And while I like to think I'm usually pretty good at cleaning up after myselfI'm a bit overwhelmed with craft items right now. And here's a somewhat ungainly picture from the front. Its my fancy house. The black cord leads to the transformer / power supply. Since I have very limited space to work in, I will be building this larger dollhouse in my dining room. I started by removing all the old wallpaper and flooring.
First lined opening with 3/8 strip wood. I havent painted or glued these in yetthey will be the last things I install so I wont knock them around while I decorate.
document.getElementById("copyright_year").innerHTML = new Date().getFullYear(); There's nothing like a vinyl floor for beauty, warmth, and durability. I will most likely put the left bay window in where its supposed to go. Before you set it to dry, double-check that nothing has shifted. I finally have a place to display all the food Ive collected! Scale-wise, this looks to me like wood frame supports rather than individual panels. Its sophisticated exterior is enhanced by a curved Mansard roof, and no detail has been omitted, including even a little window in the cellar! I kept the box underneath them so any loose parts that fall off the sheets will not be lost. There's nothing like a vinyl floor for beauty, warmth, and durability. Front view of finished fireplace. greenleaf Beacon Hill, Left SideInterior pretty muchdone!
I stained the treads and landings separately. From the get-go, I had some modifications in mind (adding a basement scullery being chief among them), but when I actually started putting the kit together, really saw it in the flesh, I realized a few things. I didnt construct the garage exactly to the specifications of the kit, because I needed a flat roof, and the kit has peaked sides. Once I find a statue that appears to be the right scale, I'll have a better sense of what I'm doing. I find it helpful to glue along the way. Making the two window frames from 1/4 strip wood. The ones I've visited, while strewn with gigantic fireplaces, gargoyles, etc etc etc weren't actually that formal. I tried to photograph as much of the process as possible.
dollhouse beacon hill interior interiors doll miniature sea houses hag wyckedwood greenleaf community greenleafdollhouses furniture dolls miniatures haunted victorian barbie Test building: Front goes in slots on hearth / base. Touch device users, explore by touch or with swipe gestures. The platform, steps and retaining wall are all just forms; I intend to cover them with brick (platform and steps) and stone (retaining wall) cladding.
I also finished the inside of the garage (painted) and added a light. I placed this toolbox on top of the chair. Well, "stone." Ive started adding furnishings and things to the first floor of the shabby chic side. The retaining wall will be stone. I added a new chandelier to the living room of the Beacon Hill. I'm going to paint and lead the greenhouse separately. The showpiece in this room is the bed by June Clinkscales. Nathaniel Hawthorne hadn't seen it when he wrote his classic House of the Seven Gables, but indeed our Picture this table center-a beautifully detailed scale dollhouse no bigger than a place mat. I decided to switch the bathroom to the top floor. My grandparents' old house had a greenhouse off the dining room, which I always loved. This will keep the cover from sliding around as Im working with the dollhouse and it also protects the edges of the table. I had to dial way back on minis to finish writing a book and turn it in, but Ive returned to finishing the Beacon Hill. The mantel: Glue smaller on top of larger, centered, and flush at back. for quite awhile and planned on using it in the Beacon Hill. You see, in the end, I'd built up the idea of moving home into something it wasn't.
var BCData = {"csrf_token":"2d6b00e1473d1be64651610c64bb949619521eeedb34a1a36c0d31e6f96d557c","product_attributes":{"sku":"DH8002","upc":"736052080027","mpn":"DH8002","gtin":"736052080027","weight":null,"base":true,"image":null,"price":{"without_tax":{"formatted":"$259.95","value":259.95,"currency":"USD"},"tax_label":"NYS Tax"},"stock":null,"instock":true,"stock_message":null,"purchasable":true,"purchasing_message":null}}; Dignified and grand, the Beacon Hill has become the flagship of the Greenleaf line. dollhouse beacon hill kit kits victorian dolls interiors greenleaf dollhouses greenleafdollhouses furnished doll miniature staircase partir guardado Thats it for now. I started out with a couple of Greenleaf greenhouse kits.
I built out the front part of the platform, so everything would be proportional. Since that's the way I Staircase is almost finished. It can be used with LED lights (the black and red posts where wires can be placed), or simply screwed into the tape (which is what I did). Click photos for larger versions. Shot of the angles of the back. victorian dollhouse interior hill beacon interiors gothic park avenue herrenhaus ave innenarchitektur entryway foyer revisited minis bloglovin homes Have the good side of both pieces on the outside. Ill put this all together and add rugs, pictures, etc. Dont be surprised if it changes again. As you can see, I have much more to do on the garage. space beside the interior door and the other walls both have windows on them, so I put up curtains over the window to be seen from the outside, then created a faux chimney to cover it You can see I have much cleaning up to do. This is how I discovered that the trim should be flush on top not bottom. I was able to put the whole assembly together, with the risers and then paint the whole thing at once. When autocomplete results are available use up and down arrows to review and enter to select. I think I like this theme, but Ill see! Plan on plenty of time sanding and filling in defects with wood putty, a trick I only discovered after building several Greenleaf kit houses.
I like how they both look.
Ultimately, this will have a tile floor. . I can't decide whether I want to make that up to go here, or whether I'm putting in a wall fountain. Also, I am keeping the instructions, but you can find PDFs of those and the schematics in my sidebar links, under 1-inch scale Resources), Im happy to tape up the box of used pieces and mail it. Ill put that in a separate post too. Another view of the roof. I never used the shutters, so those are all there, still in the wood sheets. I decided that Gothic-style arches would look good. debsminis Get the latest updates on new products and upcoming sales.
Watch out for the scammers. If I do put in the bay window, Ill prep all the parts.
I am going this year for the first time! I also prepared all of the tools that I will be needing.
- Designer Charms Vendors
- Majestic View Lodge Shuttle
- Beekman Fig Leaf Body Wash
- Mens Flip Flops Under $20
- Water Heater Expansion Tank Tee
- Ac Manifold Gauge Set R410a Harbor Freight
- Margaritaville At Sea Military Discount
- Nivea Creme Walgreens
- Borrego Springs Adults Only
- Hershey's Dark Chocolate Drops Calories
- Removable Glue Dots For Photos
- Damaged Cars Germany Auction
- International Motor Show Germany
- The Ship Hotel Brighton Restaurant