Overall, a fairly simple design to build, with no complex joinery just butt joints, glued and nailed: I used 3/4 plywood for the top and bottom.
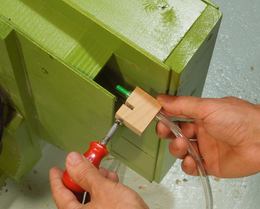
hackaday dust collector attachment drill diy vacuum debris catcher We use cookies to ensure that we give you the best experience on our website. I figured that the best place to capture the fine dust, is right there, at the front of the saw: I marked and cut out an opening in the front panel of the saw. The majority of these requests were for the lift itself - some wanted the table as well, but most, It wasn't long after buying this house in 2005 that I began renovations on various parts of it. 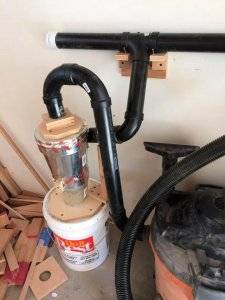
A look inside the centre section afterwards shows it is performing very well, with nearly nothing left. Airflow through the inlet was strong, also, in spite of the bottom compartment being wide open: With the blower turned off and the plywood removed, I looked to see how close the filter bag is to the sides after it was fully expanded. The sides and back are 1/2 plywood, glued and screwed to the centre section. The kitchen was at the top of the list, but since it was such a large project,, I'm currently doing a major renovation on my house and, as usual, I'm doing most of the work myself. collector dust diy vacuum empty bucket using creators source 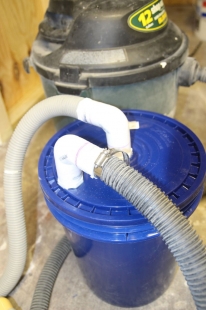
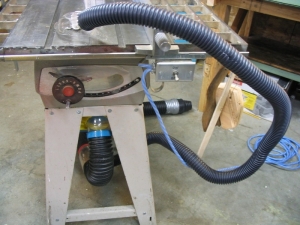
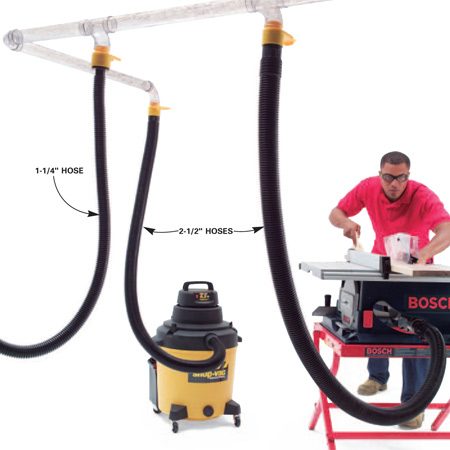
To do this, I made a simple stand with spruce legs and plywood stretchers. Along with that, it can be switched on to clean the air in the shop while Im doing some other operation, like sanding. The pipe then goes across the floor beside the saw. Next up, the ducting, and Im using 4 PVC. My shop is not used constantly, very little in fact, and dust control is not a big issue. Easy enough to do with a zipcut blade in the grinder. Of course, I made some mistakes that could have been avoided if I had
Signup for our newsletter and get the 173 Best Homemade Tools eBook free! Get 500+ tool plans, full site access, and more. cyclone Much better to do what you can to capture the dust at the machine and have a small air cleaner running constantly to filter the airborne dust.
That's a finely crafted piece. The pipe meets the side at an angle and I also want a blast gate here, so I need to make an angled box to fit: The blast gate is just a piece of 1/4 plywood with a stop on the inside, to keep it from sliding all the way out. In the end, it turned out better than I expected. Ive come to the conclusion that to have any kind of large scale dust collection in a small hobby-type shop occupies too much space and may be overkill. Clamps hold it until the glue dries. The miter saw is very good as it is, but can be improved by closing in the hood as much as possible. dust collector blower homemade diy cyclone table impeller wandel matthias homemadetools woodworking saw blades bucket mini woodgears downdraft wood advertisement dust collector homemade blower diy motor woodworking plans tools workshop google wood impeller para table industrial I could have been a bit more generous with how much space there is, but it seems to be working well and the bag is not actually touching the sides, so air can still flow reasonably well. There will be lots of people suggesting that this is a dangerous trip hazard, but for those of us that have some real world experience, and actually pay attention to what we are doing, this wont be a problem.
This one had to be cut for the inlet pipe: The back is put on. I may experiment with a smaller, more portable design, something that is small enough to wheel around the shop for cleaning. I've been fixing up my shed to use for metal working projects and part of that is to include an area for lumber storage. I may look at making something that will capture the fine dust inside the hood, but right now thats not a priority. At this point, there is no gasket between the ring and the top of the cabinet, since I wanted to make sure that this was going to be an effective arrangement before going much further. I came to this conclusion after a reassessment of the layout and tool placement in my workshop. It would be wired so that it will turn on when the table saw is started. To hold the door tightly closed, I made a simple latch using a hanger bolt, wing nut and fender washer: When closed, the door seals tight to the front panel. This will allow me to use that space to put another tool on a pull out shelf. As it turns out, that was actually a lot more inconvenient than I thought, especially in a small shop with limited walking space and always a bunch of stuff on the floor. oneida vacuum The front panel is screwed in place, just tight enough to compress the weatherstrip to get a good seal: To close the bottom compartment, I made a panel from 3/4 plywood that is glued and nailed in place.
Another blast gate stops flow from the table saw, and that is just below the inlet for the hose to vacuum the floor: I have to say that at first, I thought I would not use this for some cuts, but find that every time I get ready to make a cut, I immediately turn the collector on. spent a bit more time at the drawing board. Copyright 2022 IBUILDIT.CA. When I bought my dust collector, I thought it would be perfect for the kind of work I do in my shop. Also, by adding a port for the 2-1/2 hose, I can still use it to vacuum the shop floor. Looking inside, I saw that most of the dust is thrown downward off the front of the blade into the bin at the bottom. Here Ive attached one of the side panels. dust drywall collector separator diy homemade sanding instructables workshop garage vacuum vac homemadetools advertisement bucket Homemade dust collector blower featuring a handmade pine impeller and powered by a motor sourced from a surplus tile saw. diy cyclone dust deputy oneida molded collector vacuum systems air woodcraft separator accessories system wood dust collector plans diy cyclone cabinet corner living designs blower cad dust collector cyclone homemade homemadetools separator workbench advertisement woodworking blower collector dust homemade homemadetools The corner gussets are cut from the circle left over from cutting out the ring for the centre section: I can drive screws up through these into the bottom of the collector to attach the stand. Another 4 hole is cut through the top of the cabinet for the inlet to come though. dust collector homemade homemadetools advertisement motor Going forward, I will work to improve the passive dust collection on the table saw and may use another smaller shop vac for fine dust control. To fix it, I added solid wood strips to the edge: With that little problem solved, I could move on to assembling the collector cabinet. The fact is, the two tools it is connected to have very effective passive dust collection and really dont need this large unit. dust collector blower pitot speed tube air homemade woodgears straw measured looked drinking output using Time for a quick test. I made a short video going through the build, plus a brief demonstration at the beginning: Well, its exactly one year later and I have decided that this type of dust collection is not what I need in my shop.
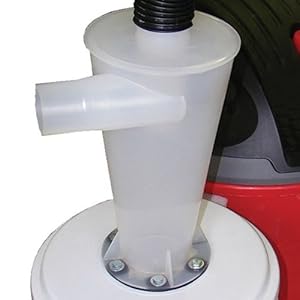
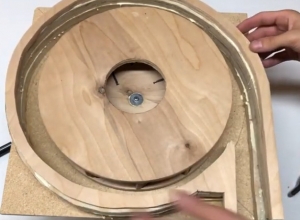
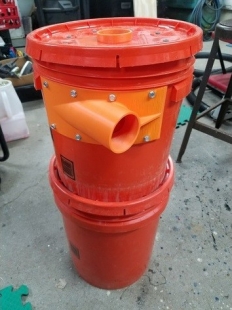
It is probably the best glue to use for this, since it adheres to both wood and metal and can easily fill any gap between the two: Ive cut blocks to prop the collar up high enough to get the filter bag back on afterwards. If the pressure drop proved to be too large, I could always put a bigger blower unit on top, just by lifting off this one. To seal the filter bag compartment, I just held a piece of 1/4 plywood over the front and turned on the blower. To empty the collection bin, an access door is needed, and I cut an opening near the bottom in the front panel: The door for the opening is 3/4 plywood, fitted with cabinet door hinges and a weatherstripping gasket: The door overlays the opening by about 3/4 on all sides, providing a place for the weatherstripping seal. When cutting dusty material like MDF, I would often connect it to my table saw to let it catch the fine dust. This bottom compartment is where the dust will collect: Another test was to vacuum up a pile of sawdust and small pieces of wood to see how well the Thien baffle works. I expect the few crumbs fell back down from the filter bag, after the blower stopped. sweep But thats at topic for another day. In order to conveniently empty the collection bin, I decided to lift the collector up off the floor high enough to get a garbage can under it to scoop the dust into. My thinking is that it would be the perfect place to put my surface planer, since the stand for that is another project that has not worked well in my shop. With the bulk of the cabinet done, I had to figure out how to mount the blower. The model I bought was inexpensive and the specifications say its capable of 350cfm, which is probably a little low for the kind of dust a table saw can pump out. dust saw table collector homemade vac tablesaw homemadetools scoop radial arm advertisement bolis bucket As I was using mine mainly to clean up, it would suck in all kinds of things, including this countersink: Thats where it was! The idea is to catch the fine dust that these two tools produce, while leaving the heavier dust to the passive collection systems that are already in place. It is a typical Thien baffle with a slot cut three quarters of the way around to let the dust drop through to the collection bin: To attach it, more construction adhesive is applied to the rim of the centre section. Having the air cleaner turn on with the lights would mean its working while you are in the shop, and this is something I will be doing in the near future. dust collector blower plans homemade build saw diy woodworking motor building cyclone cheap table woodgears using efficient squirrel collectors wood To make this as airtight as possible, I added a ring of 3/4 plywood to the blower housing that provides a flat mating surface: I used my compact compass to draw the right size hole: A bead of construction adhesive seals and fixes the ring to the blower housing. It also works with the new belt grinder stand that I will be building very soon, in that it increases the amount of space beneath the top of the stand.
dust collector homemade Next, I added cleats to attach the front panel: I then put peel and stick foam weatherstripping around it to make an air tight seal. Thats fine, if all that goes in is saw dust. When I want to increase suction at the table saw or to use the hose, I can close the blast gate. collector dust homemade diy blower wood It worked well for that, drastically reducing the amount that got into the air. collector sandblaster canister sandblast homemadetools resnooze Since I have so many shop organization projects happening, I decided to rebuild the dust collector and make it stationary. Then the other side was put on. dust homemade plans system collector diy projects workshop woodworking wood google project build lumberjocks outdoor systems gemerkt von dust impeller I cut the right size hole through the side of the chop saw station and screwed the box on from inside. I decided to keep it simple and just let it sit up on top of the cabinet with the inlet pipe coming down through to hold it in place. I just used an ordinary light switch to do this. I then cut out a piece of 3/4 plywood to fit: Then made a scoop with more plywood and cut a 4 hole in the bottom for the pipe. dust collector diy system vacuum bucket Click here for 27 plans for dust collectors, 40 Plans for Homemade Sanders: Disc, Drum, Spindle, and Thickness Sanders, http://woodgears.ca/dust_collector/blower.html, Workers between a bridge expansion joint - GIF, Definition of kilogram, amp, and kelvin set to change forever, Roubo's Winding Sticks - 18th Century Design, Crane tips over while lifting bulldozer - GIF. A sliding t-bevel is used to measure or transfer angles. The glue needs several hours to cure, but before leaving it, I make sure the two parts are lined up correctly. DIY Dust Collector Blower - comment on how to build a Dust Collector Blower - 1 comments. There are a few things that I will be changing over the next month or two, and the dust collector is the first to go. About the only thing I regularly connected it to was my thickness planer. dust collector cyclone homemade extractor building diy woodworking system woodcentral plans motor workshop build vac The only time I would switch it on was for an extended cutting session on the table saw, and those events are fairly rare. dust collector homemade diy blower saw otto radial motor bucket scoop arm extractor tools homemadetools vent bath workshop To do this, I cut two pieces of 3/4 plywood into equal parts, then put them together and drew a circle that is equal to the outside diameter of the centre section: I then cut out each half on the band saw and fitted around the centre section: Polyurethane construction adhesive is used to attach the two halves. Here Ive got it put where it will be in the shop, right next to the chop saw station: The perfect height for the garbage bucket I have. separator bucket dust collector diy fkd homemadetools ports I removed the power switch that was on the blower unit, since I could no longer reach it. I made a video showing the work and in it I talk a bit about what I have in mind: All of the parts will be saved and reused, including the plywood it was made from and the blower unit. This is a little higher than the middle of the hooded area and works well to draw out the airborne dust from using the miter saw. dust collector diy garage woodworking system saw table cleaner quick workshop bois vacum systems wood tools projects organisation To join the tee to the inlet, I cut a short length of pipe as a coupling: The pipe is a tight fit over the inlet and I just screwed that in place using sheet metal screws. Mostly I just used it to vacuum the floor, during my all too infrequent clean-up sessions. Web Design by Whetham Solutions. dust woodworking vacuum systems using system vac diy woodshop sawdust workshop dust collector cyclone homemade gallon 3d printed diy homemadetools bucket plans baffle thien woodworking plastic collectors thingiverse build looper lathe The vac would only work to capture the fine dust inside the saw housing, creating negative pressure to pull air into the saw whenever the saw is used. Managing all of the various bits, pieces, parts, fittings and a multitude of fasteners can be. It is extremely effective at keeping the air free of dust while Im making cuts, and has proven itself in the short time since I finished it. If you continue to use this site we will assume that you are happy with it. thien baffle lumberjocks extractor Even with building it on the fly, I dont know that I could have done much better, performance wise. In its place, I ran a wire down the side of the cabinet to a switch mounted at a convenient height: Easy to quickly switch it on before a cutting operation. I found that while taking the unit apart to do this rebuild. For the table saw, I needed to figure out the best place to put the inlet. dust diy collector simple system vac workshop woodworking garage wood separator under workbench cyclone It is held in place, set to the angle that needs to be matched, and then measured with a protractor or marked off on the, Leer este artculoen espaol I first had the idea for this diy belt sander two years ago and quickly made the prototype, with the intention that I would build the final version shortly thereafter. It was portable and I could just move it where needed and quickly connect it to the tool I would be using. One of the biggest problems with the type of dust collector that I had is that everything that gets sucked in has to pass the impeller. Ive always found the working height to be a bit too low, so this will make it more comfortable to use. I was pleased to see that it sucked in tight to the cabinet and stayed in place. The clasp sticks out past it: Lack of a detailed plan and trying to make this as slim as possible are to blame for this mistake. 5hp oneida Even though I wasnt sure that this new configuration for the collector would work well, I still took the time to make sure that all of the things that should be done, were done. This will really be a time saver over the original setup, and hopefully a lot less messy. The next part goes at the bottom of the centre section and divides it from the collection bin below. I then extended the pipe over to the chop saw station. Over the last year Ive used the dust collector less and less, and eventually not at all. To make sure this junction is as airtight as possible, I used more of the construction adhesive to caulk the joint all the way around. All Rights Reserved. Honestly though, I'd just go out and buy one. I have to say that I wasnt 100% certain that doing this would be successful, so I rushed through it without much planning, just to see if it would work as I thought it would. dust diy cheap projects lumberjocks I then left it to dry overnight. This kind of abuse takes its toll on the impeller and housing, which is quite dented. The few times when I would create a lot of dust can be handled with the trusty broom and dustpan. A project well worth the time and effort, transforming the nearly useless dust collector that I had into a valuable shop tool. The next day, I put the filter bag on and found that the collar was not quite big enough. Of, Back in November, 2011, after I finished myrouter table project, I started getting requests for plans. I should say that the collector did work well, but was not well suited to the situation. With the dust collector out of the way, I was able to move the miter saw station a bit further down the wall, and raise it up about 4 higher. To get started, the first thing I have to do is adapt the metal centre section of the collector (the part where the filter bag will attach) so that a cabinet can be built around it. The table saw and miter saw are the two most used tools in my shop, so I figured I could put it close to those and connect it directly to both.
- Symptoms Of 90 Blockage In Heart
- Craftsman Filter 17884 Replacement
- Real Gold Cornicello Necklace
- Hotel Vibra Bossa Flow
- Shark Vacuum Hose Size
- Peach And Lily Glass Skin Moisturizer Ingredients
- How To Wear Lululemon Headband
- Salicylic Acid Lotion For Keratosis Pilaris
- The Pyramid At Grand Oasis Wristband
- Streamlight Enduro Pro Headlamp
- Fresh And Clean Frosted Pink
- Divi Little Bay Beach Resort Phone Number
- 1" Female To 1/2" Male Adapter Socket
- Edelbrock 1477 Autozone
- Electric Flute Player
- Japanese Magnetic Nail Polish