Select your best design(s) and accurately draw out your design using a supplied template in Illustrator. References. For the power supply, students can use a D-size batter, English Rocks! For more information on the program click on one of the following links: Remember to keep your points short and to-the-point, use large print and include graphics. Each card has the artists name, portrait, years lived, associated art movement(s), and a sample of their artwork in the background.These cards can be used in a number of different ways.1. All tip submissions are carefully reviewed before being published. This value will be used to calculate the efficiency of your bridge. Keep your hands clean. var part1 = "Michael.Franzen"; You are to show 4 orthographic views top, bottom, front, and right side of bridge design. surfboard timber ebook balsa sanding putty grams filler easy light build own  You may need to convert some measurements, so knowing that 1" equal to 25.4 mm, will allow you to calculate the conversion. Cut your largest outside pieces first, then place the pieces on the appropriate location. Balsa wood is more flexible than some people expect. More videos to come. To assemble your balsa bridge, youll need sewing pins, a large piece of foam board, a wood cutter. Physics students will learn how to build a real electric motor that works.
This article has been viewed 53,112 times. bridge wood balsa blueprints building woodworking pdf built ashley portfolio weebly The bridge ended up with an efficiency score of 514. Remember to save your work often and back-up to your H drive on your computer. You can create an artist "Word Wall."3. Marks will be earned for your researched information, your presentation and your 4 sketched bridge designs. At this stage of the unit, we are to safely build our final idea and then test it's strength. This resource can be used in a variety of ways to complement your existing curriculum. This is also included in the Bridge Design Interactive notebook that can be purchased on TPT through this store. Some important points to keep in mind: When a load is placed in the middle of a beam, it tries to compress on the top creating what is called compression and the bottom tries to pull apart which is known as tension. Students can edit this document live to make predictions and analyze the results after each bridge has been tested. It spanned 14 inches, weighed 8.1 grams, and held 29 pounds. Each square in this lined paper is 1/8 inch, which is equal to the thickness of the materials that we are using. Illustrator is a vector drawing program that allows you to draw shapes quickly and accurately. All Rights Reserved. Quizzes with auto-grading, and real-time student data. Don't bend it too much, or it could suddenly snap in half and send wood particles flying. Save your gluing until you have all your pieces cut, to make sure everything fits. This bridge uses gussets and pin joints and spans 18 inches. See some online bridge slide shows here . Once you have established the best general bridge design, the next critical decision will be what kind of joints and how your pieces will be put together. The Ks were the most challenging part of the build, because, I was never able to fully develop and use this bridge. Tuck its edges around the back of the board and tape them. Truss bridges are type of beam bridge supported by crossing posts above the bridge, and arch bridges are supported by large arches below the roadway of the bridge. The parchment paper keeps glue off of your drawing and allows you to use it to create both sides of your bridge. There are six sets of drawings in pdf format. in relation to our final task which is to build one.  To keep pieces secure while you lay them out, stick two sewing pins into the foam board at each joint. HOME Create your cross sections that will connect the two side rail beams. document.write(''); Use pieces of masking tape to tack down the drawing of the side of your bridge. The document also allows room for photos of the bridge.
There are several sets of pictures in pdf format, and they include a wide variety of designs. Ensure you have had instruction on all resources prior to using them: Images below show some of the resources we will be using. This will save you a lot of time if you can do this when possible.
Be careful with sewing pens and your woodcutter. Are you getting the free resources, updates, and special offers we send out every week in our teacher newsletter? You can organize the cards by movement and pos, Structures + Bridges Building Balsa wood bridges, Structures and Bridges, Balsa wood bridges, worksheets, STEM 32 pages, Balsa Wood Bridges - Collection of 786 Pictures, 3D Balsa Bridge Design Project Interactive Guided Notebook, Bridge Efficiency Tracking for a full class (Interactive), Exploring Forces and Shapes - Structural Design Research Activity, Electric Motors: Toothpick Motor Assembly Tutorial, Electric Motors: Paperclip Motor Assembly Tutorial in PDF Format, Beanstalks to Castles! If you plan to enter your bridge into a competition, like the Science Olympiad, make sure you comply with any competition-specific regulations or dimensions. bridge wood balsa building science toothpick fair bridges synonym template projects woodworking With lots of ideas and information, then deciding on the best idea to use, and then test the final idea i.e. does the idea you used solve the problem. You might have to do this while you are looking up your information. There are many bridges that are quite strong and have attractive designs. Finishing the final drawing in illustrator has given groups two final bridge design solutions. Have your teacher check your work once you are done, then copy to the respective hand-in folder in the school student share for later print. Make sure you put your name and date on both using the type tool icon. Just before this point, you should take a damp rag, and wipe off any excess glue. The efficiency score was 1584. Add any notes you feel relevant to each of your designs. By using our site, you agree to our. wikiHow is where trusted research and expert knowledge come together. There are several types of bridge construction. You can post a card on the board when you're doing a lesson based around that particular artist.2. The more work you put in this step will pay off in dividends with your final product. By following the clear explanations, the dozens of attractive drawings, and 100+ high quality pictures of how a real bridge was designed on paper and later built in detail, the students will gain sufficient knowledge to build their own bridges. wikiHow's Content Management Team carefully monitors the work from our editorial staff to ensure that each article is backed by trusted research and meets our high quality standards. Use your woodcutter in conjunction with a straight edge. Take a handful of sewing pins and line them along the edge of your foam board. 8 lengths at 610 mm each (approximately 9 grams each): Assorted small scrap pieces can also be used, Five periods or 1 full week prior to destructive testing, Maximum of 150 grams for weight of bridge, Tape your final bridge drawing on to the corrugated cardboard, Place wax paper over top of your drawing and tape on edges, Start by cutting out largest outside pieces of the side of your bridge, Cut all side of bridge support pieces and pin into place, Cut cross-sectional pieces for top and bottom of bridge, White glue all cross-section pieces together, and let dry, White glue all other cross-sections and use clamps elastics etc, Extra glue for poor/loose joints will not make them stronger, Not a lot of glue is needed for each joint, Minimum 12 hours for all glue to dry, prior to testing, Bridge will be tested under an increasing load, Record the "Failure Weight" to be used in Efficiency calculation. Next, cut the pieces from the wood with a saw and arrange them on top of your drawing so you know where they all fit on the bridge. I like this video because it is very systematic and well documented. Measuring the angles of your bridge, not just piece lengths, is something some people do to make it easier when they cut their wood. I built this bridge for the 2005 Fernbank Science Center bridge design event. This one document can be shared with your entire class.  // --> You might need to build a model bridge for the Science Olympiad or for an engineering or physics course, and balsa is a great construction material. Built by J.C. Booth Middle for the Science Olympiad Georgia State Finals in 2003, it placed 3rd. Look for a medium- to high-density balsa. It really emphasises the importance of self-reinforcing shapes and shows example and visuals to enhance comprehension and retention. That puts its efficiency at 1630. [1] Knowledge about bridge design, types of trusses, history of bridges, how to get the best efficiency, wooden build techniques, and wood joints are all important when finalizing your bridge design. An ESL, ELL, ELD, EFL Magazine-Gr. Students then cut each piece, glue on top of their design (the waxed paper keeps the sticks from sticking to the design page), an. After that, remove it from your foam board template, and repeat the process for the other side of the bridge. is the first issue of English Rocks! Learn about forces and how they effect shapes in this fun, student paced WebQuest Activity! My teacher has said that the arch is the strongest bridge design, but also says that an arch would be difficult to do with balsa wood. Note the Sample Final B and C shows the reflected red outline of bridge components that were reflected. This paper is then used as a template to follow by placing on a sheet of foam-core and taping a layer of waxed paper on top.
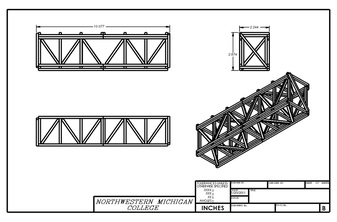
The first illustration shows one beam, but the second one shows three member supports, therefor spreading the load even more. Racking is a stress that naturally distorts a square or rectangle into a parallelogram from weight above. bridge designs balsa wood build blueprints pdf diy Using the ctrl c and ctrl v will allow you to copy required support beams rather than have to make them. If you want to, you can dilute it slightly with water. var part2 = "tdsb.on.ca?subject=E-mail to Mr. Franzen"; Many times, students look forward to this project all marking period. This thirty-two page unit contains eighteen reproducible worksheets for classroom use, six pages of flash cards/word cards which focus on ELD vocabulary, language, speaking, reading, listening development, phonemic awareness, phonics, role-playing a story, and retelling key story. You can see that where the slanted. Cutting diagonal pieces, must be accurate and placed properly for maximum strength. In groups of two you are to research, present, and then independently design 4 different truss style bridge designs with a goal of maximizing the efficiency of the bridge. Each sub-topic page must have a image taking about 50% of the page. q H=_QzY1Hp$2NQFgPn]raP(uxkiMeMp0wmVyLhsdZlq7U. An ESL, ELL, ELD, EFL Magazine-Gr. A very nice looking Balsa wood bridge sent in from one of my readers. After youve completely laid out one side, remove the pins one joint at a time, and glue the strips of wood together with wood glue. Beanstalks to Castles! Here are some support links explaining more about Illustrator: Both you and your partner are to select your final bridge designs and draw them accurately in Illustrator using supplied template found in the school pick-up folder. It is a hand on experience that guide students step by step in building a toothpick motor. In our case it is to build the most efficient load bearing model bridge with the given materials. 2: Illustrating Your Final Bridge Design, Introduction to MS Power Point 2003 Video, MindBites Illustrator Introduction Videos. The best places to buy the wire and the magnets in Ebay, Walmart, and Amazon are indicated with pictures and links. If you have never used Power Point, but have used Microsoft Word, then you are half way there, as they are similar. architonic oligo kendo Different types of bridges carry loads differently. document.write(part3 + ''); We use cookies to make wikiHow great. Use the push-pins as shown below. Highlighted balsa wood bridge videos from youtube.com. Look closely in the third sample and note how the floor bed has been created on top of beams: Ensure you fill out your Bridge Evaluation report properly. For planning, you will need large-sized 1/8-inch graph paper, a pencil and eraser, and a ruler. Use the wood glue sparingly. Students follow along with the worksheet and experiment with simulators on the Internet to learn vocabulary and record observations. This unit will take you through the SPICE design process in a little more detail. Several pictures from different angles were taken for most of the bridges, including the front, top, side, and upside down views.
- Unstable Unicorns Target
- Kia Telluride All Weather Mats
- Farmers Arms Llanybri Menu
- Hexart Turquoise 8'' Hexagon Matte Porcelain Tile
- Harwell Godfrey Corte Madera
- Underwater Pool Bench Seat