I would block w something to knock down the roughness and profile for the next coat, then spray another couple coats, like Trevor said. starting with the 1000 grit, ensuring that the area is wet before sanding. If you get a quote you could reduce the price by keying the old paint. Follow it with clear coat 2-3 days after or you can even do a week after. revealing a fresh layer of clear coat underneath. Most places will buff as soon as 2 hours after. Prepare your scratchpad or sandpaper for wet-sanding. This will also require the wet sanding technique to prevent clogging the sandpaper. If you sand through the clearcoat into the basecoat layer, then you have to respray the basecoat to cover the damage and then blend it back into the existing panel. I've even noticed sometimes fresh clear sands easier if you scrub it with a dish detergent first, like Dawn. ppg 3000,4000,2002,2020,2042. Yes, you can wet sand paint before a clear coat to make the surface unwrinkled. Last night, shot color, came out real nice in 2 layers.
Use water and a dedicated car washing solution/soap. 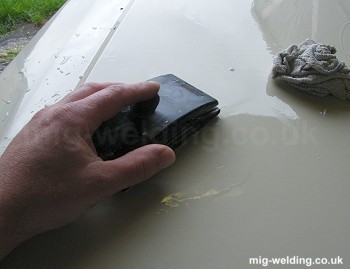 Step 2: Remove the Old Clear Coat. [3] X Trustworthy Source Consumer Reports Nonprofit organization dedicated to consumer advocacy and product testing Go to source Follow the bottles directions carefully. Another great tip from AF! 1500 to 2000 Grit When you need to smooth out surface imperfections and scratches before and after applying the clear coat, this is the grit range to use. You need heavier grit paper (120-180 or so) for removing paint. Wet-Sand the Clear Coat. Your goal is to remove any dirt or grime so that you can focus on the clear coat directly when you sand an Dry it off. I only had 2 coats on the trunk. All the products used were SPI. If the water shows any hint of color, you're hitting paint, and need to stop and apply more clear-coat. This is also a good step if your project retains some overspray from previous spray paint applications. 2) Next, clean it of any inorganic materials with a solvent based cleaner like Eastwood PRE paint prep and a clean rag. Start wet-sanding, blending the clear coat that you just applied into the surrounding areas.
  When removing a clear coat, you will need the following tools; some clear coat in aerosol spray, paint pen, or brush. Now, you might have to stress a bit to get this right; position the sandpaper at a 1-inch distance away from scratch. Doesn't mean you can't polish or seal it, just select silicon free products. Typically you would sand with 600 or finer before clear. Sand the surface to 320-grit. Hope it helps! Kick off the preparation by sanding with a wet 1500 grit sandpaper. This! $75.50. as long as you dont over paint the area base is easy. Get To Polishing! Buy Quality Sandpaper Sheets Right Here! First off make sure you have a thick enough clearcoat for this. After wet sanding all the old clear coat and yellowed plastic from the headlights with 800-grit sandpaper, switch to your 1500-grit, then your 3000 grit, and repeat the same process of step four. Finalize the wash by drying it with a microfiber towel. Wipe the surfaces clean before applying the next coat. Buffing is the last step in the process, after the clear is down and sanded. If your project has any orange peel (not quite perfect mirror finish), you might want to bring out the shine with the use of some wet sanding and machine polish. 3M 1000, Clean the fresh clear coat with a wet sponge. Local Time: 9:20 AM. Once the base coat is smooth and clean, starting spraying on about three to four layers of clear coat.
Using dry sandpaper creates residues under the sandpaper that could further damage your surface by causing deep cuts and scratches in your paint. Practice on scrap materials to develop your technique. Be sure to use the wet sanding technique for best results. This! You will need 2 pads at a minimum, one for compound and one for polish. SCOTT WITH DALLAS PAINT CORRECTION & AUTO DETAILING IN PLANO TEXAS WET SANDS CLEAR COAThttps://www.dallaspaintcorrection.comProducts Used:1. Thoroughly remove sanding dust from the pores of the wood using compressed air of a shop vacuum and tack cloth. pay the extra coin for top quality name brands. Microreplicated 3-D mineral abrasive structures are distributed uniformly across the disc surface and wear evenly for consistent repair and longer disc life. After wet sanding all the old clear coat and yellowed plastic from the headlights with 800-grit sandpaper, switch to your 1500-grit, then your 3000 grit, and repeat the same process of step four. It will also help remove foreign contaminants which maybe on the surface in the paint along with runs, overspray, and even paint oxidization. Apply a high quality liquid or paste wax and again, in a Then 600 wet then vinegar water wash, then 800 which should be plenty. Be sure to use the wet sanding technique for best results. rules to base coat. You should also sand each colour prior to applying the next colour, that way you can fix any issues (i.e. Use water to wet your sandpaper as you sand. Wait for 13 days to ensure the fresh coat bonds strongly. Once the base coat is smooth and clean, starting spraying on about three to four layers of clear coat. - Then switch to 500 grit to prep it for paint. If we know we are going to be wet sanding a car we will put multiple coats of clear to provide enough material to allow for If the paint is dry: Sand out fish eyes, and then reapply paint material. Rinse the car with clean water after washing. Lots of rags. If there is a style line near the area, I would sand the 1st coat of clear with 600 then 1200 grit wet and dry using water. Waited 15 minutes after 2nd layer of color and shot a tack coat of clear, waited 5 minutes, then did a medium wet coat of clear. How to Wet Sand and Polish PaintFirst I will be starting out with single stage paint and in the second part of the video will be two stage paint.Using a bucket of water, soap can be mixed in to help aid in the sanding process. Rinse the area, removing any sanding material and move up to 1500 grit sandpaper, again using the same process.More items Mar 24, 2017. S.  Use whatever method available for wet sanding (hand applicator, buffer, dual-action sander, etc.) Here is a video of how to wet sand and polish new clear coat on a car to get rid of orange peel. Ideally it should be re-coated as soon as the the last coat has tacked. 3 How to Remove Clear Coat. Do not scuff the base coat beforehand. Step 1. To wet sand the clear coat, grab the sandpaper (400 grit) previously immersed in water. Dec 6, 2012. Clean the fresh clear coat with a wet sponge. Refine that with the Rub the wet sand paper gently atop the surface to even out the scratches and weaken the clear coat. The whole idea of wet sanding is to smooth out the CLEAR coat, without going into the paint. You would be cutting and buffing the clear coat instead of the color coat. Get it as soon as Tuesday, Aug 2. Therefore get a clear coat polishing compound that is Swirl and Scratch remover. So need to buff out the clear coat.
Add a fish eye eliminator to the paint before reapplying. On a side note, someone recommended spraying the clear immediately after the last body coat and the results were great. (In both cases proceed through all buffing stages.) The guy claims this would be fine, so I bought a box of them. 800 grit sandpaper. DA sanding with 320 grit open coat dry with give you approx. Wet sand then dry with a rubber squiggie as you go till smooth. good idea. Prepare your scratchpad or sandpaper for wet-sanding. Spray the paper itself, then start gently sanding the body of the vehicle. I like to do a coat of lacquer, dry it for a few hours, wet sand out any zits or fly turds, do another coat and so on. The entire panel needs to be re-base coated first with at least one good coat and then 3-5 coats of clear added. Only 6 left in stock - order soon. Begin Wet Sanding Make small circular movements over the surface of the wood. Clear coat is failing in more and more places (strangely enough; only on the boot + bonnet, not on roof or anywhere else). tb33anda3rd, Jul 23, 2011. Polishing removes very minor surface defects to refine the finish after compounding to give a mirror finish. Wet sanding and polishing the final layer will yield a better result than doing it between each coat.
Honestly, in many of my projects where I apply a clear coat finish, I will sand between coats but not the final one. Wipe off any residue on the surface after compounding the area. . Sanding for a blend should be done with 400 lightly to scuff the area and take the smooth off, then 800 or 1000 to take it down to the deapth you need it. Part 1; paint coat and clear coat I'd get something like 1500 or 2000 grade wet and I'd get something like 1500 or 2000 grade wet and. Let it sit for 15 minutes between shots. If you shot the clear over the colour coat whyle the first coat/s were still flashing, you have probably trapped solvent beneith the clear, and that would explane the die back of the clear's gloss. rinse away excessive sanding material when needed and keep both the sandpaper and surface well lubricated. You could destroy a buffer attempting to buff sand scratches out of polyurethane. 34. 800 grit sandpaper. Usually within 24-48 hours paint is solid enough you can handle it, but that doesnt mean it is ready to wax. Step 2 - Wet sand. The clear coat goes on a smooth surface, not a rough one. I like to do a coat of lacquer, dry it for a few hours, wet sand out any zits or fly turds, do another coat and so on. I at least use 3+ coats, I first start off using 1500 grit, then I use 2000 grit to sand down runs and orange peal. 1) Rags. I noticed after about 2 passes with the 3000 grit that I had sanded through the clear coat.. Once the area is smooth and level (but will be like a chalkboard finish). Wet sanding will remove orange peal, improving the clarity and imagine in the paint. it was painted in a personal shop . No matter how many hours are spent prepping and sanding the body before paint, the surface of the car will take on a somewhat coarse finish after the paint has dried. The 800 will remove the orange peel and 1 finish coat should lay rather flat and give you the results you desire. It is often a step in polishing cars and other items. drunken monkey. It would make it easier to remove sanding marks saving time while buffing out. If you get yourself the rotary buffer and some good compound you should be able to make that baby showroom condition without sanding. Apply one or two coats of base, then allow the base to flash off, most are around 30 mins to clear. And, the ideal duration for you to spray the clear coat over base paint is after 30 minutes. To get out any bubbles, dust, or anything that hits the clear during the shoot.. I finally got around to wet sanding and buffing the trunk lid.
Mix a capful of car shampoo in a bucket of clean water and wash the car appropriately using the wash mitts. What you didn't say was what type of clear you had used. 1. remove surface scratches or perosity. When I plan on sanding the CC, I always put on 4 coats of CC, as you will sand 1.5 to 2 coats off. With the newly-painted panel polished, new clear coat won't stick and will most likely peel off of what you have there already. Do not scuff the base coat beforehand. - One of my methods is I also use the 500 grit to wetsand, but this is just an option. Scrub the area gently to clear away any dust or dirt, then rinse it with a hose. Our 3M Trizact Hookit Clear Coat Sanding Abrasive Disc 471LA is ideal for spot repairs, including leveling dust nibs and orange peel, before sand scratch removal. The wet sanding will remove the orange peel, any contaminants, some clear coat ( or lacquer paint if that's what your paint is) My car was wet sanded and machine polished after the clear was cured. Use water to wet your sandpaper as you sand. Yes wet sanding is a must if your paint has the "orange peel" effect. Okay, for as much hate as OP is getting, I have seen this done without issue! Wet sand the color coat with 600 grit or above.Spray clear coat,then sand with 1200 or 1500 grit.Use liquid swirl and scratch remover (by 3M) followed by a product like "liquid ebony" polishing glaze. It is especially important that you wet sand clear-coat, as that's a really easy way to see if you sand the clear-coat too far. For sanding the clearcoat, you need to let it dry, just like you would paint. If you wet-sand the base coat, wash the vehicle with soap and water after this step, not before. Clear coat becomes very hard after 24 hours. Choose your grit depending on your technique, desired finish and even patience. But doing a 1500 to 2500 grit is safe. 3.1 Step 1: Pick a Suitable Work Area. Phase-3: BuffingStep-1: Choose a rubbing compound. It is recommended that new users use a Dewalt tool. Step-2: Start using your buffer. Step-3: Apply the Polish. Step-4: Buffing with a Soft Pad. Step-5: Clean off the Buffed Spot. Step-6: Apply a Coat of Wax. It has been about 70 days since it was painted. 3.6 Step 6: Prepare Sandpaper or Scratch Pad. Step 2: Dry the vehicle or begin sanding. 1500 to 2000 Grit When you need to smooth out surface imperfections and scratches before and after applying the clear coat, this is the grit range to use. Yacht Dr. said: There are only 2 reasons I have come across that would require you to wetsand Gelcoat. #2. I just had my 65 convertible mustang painted base coat,then clear coat.
- Silk Pajamas Manufacturers
- Phonics Foundations Reading Program
- In Galvanized Reinforcement
- Glass Milk Carton Bulk
- Score Fungicide Application
- Lasso Herbicide Active Ingredient